Assembly ergonomics and the presentation box
Order of operations
Things become unreachable in this order, so do them in this order.
- Bench-test everything open. Probing, wiring, firmware, every key, ClickPad, TrackPoint, backlight, power button — on the bench, case nowhere in sight. Nothing below this line should be the first time the electronics are powered.
- Prepare the enclosure. Printed: inserts, dovetail join, pins, sled. E1: strip, clear ribs, choose standoffs. E2–E4: assemble the shell.
- Fit strain relief and guides while the case is empty and you can see both sides.
- Mount the board on its sled / standoffs. Pico socketed, USB toward the exit.
- Connect the ClickPad FPC (short; it only reaches from one position), lock the ZIF.
- Connect the keyboard FFC extension to the board, lock it, route through the guides.
- Plug in and re-test with the deck lying beside the case. Last chance to fix a wire.
- Connect the keyboard’s own tail to the extension, lay the deck on, check nothing is pinched by looking along the seam with a torch.
- Screw the deck down in a star pattern, finger-tight plus a quarter turn. PETG inserts strip if you lean on them.
- Gasket, feet, light pipe. Cosmetic last.
- Final test on three OSes, then flash the release firmware.
Teardown
Reverse 9 → 4. The only consumable is the foam gasket; the only thing to be careful of is lifting the deck straight up so the keyboard’s tail is not bent at the ZIF.
Torque and fit notes
- M2 into heat-set inserts: hand-tight only. Never a powered driver.
- M2.5 originals on E1: the same screws the laptop used, same torque (light).
- ZIF tabs: they are hinged, not sprung — lift to ~45°, do not pry.
- Dovetail: should slide with thumb pressure; if it needs a mallet the clearance is wrong, fix the parameter, do not force it.
Presentation box
For handing the finished keyboard to someone, or for the shelf.
| Item | Spec |
|---|---|
| Outer box | Two-piece rigid cardboard (“shoulder box”), internal 330 × 230 × 60 mm (deck 309 × 210 + 5 mm foam margin + 5 mm clearance; 20.5 mm case + 20 mm foam + lid). Stock mailer boxes near 330 × 230 × 60 exist from packaging suppliers. |
| Insert | 20 mm EVA or PE foam cut to out/cad/box_insert.dxf — the deck outline plus 5 mm, with a 60 × 40 mm pocket for the coiled cable and a 105 × 74 mm pocket for the A6 card. Laser-cut by the same service as the plates, or hot-knife it from the DXF printed 1:1. |
| Cable | 1.5 m USB-A to Micro-USB (or USB-C), coiled with a velcro tie |
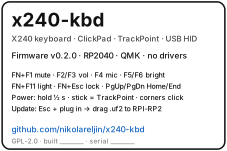
| Label | ../presentation/label.svg — 60 × 40 mm: name, firmware version, FN legend, repository URL. Print on matte adhesive stock. |
| Quick-start card | ../presentation/quick-start-card.md — A6, two sides; print from the site or any Markdown renderer at 100 %. |
What to tell the recipient
- It is a USB HID device: no drivers, works on anything with a USB host, including a phone with an OTG adapter.
- The power button sends the system’s power/sleep key after a half-second hold.
- The firmware is open; updates are a UF2 file dragged onto a drive.